

Hello there, in this part we’ll take the same ideas and principles as in part one, but this time, we’ll use a tool much better suited to what we want to do – Adobe’s After Effects. ;) As usual with Adobe Software, if you’re new to it, it can be pretty complex, so I’m bound to give you a brief introduction to the software first.
Aftur Effucts, huh?
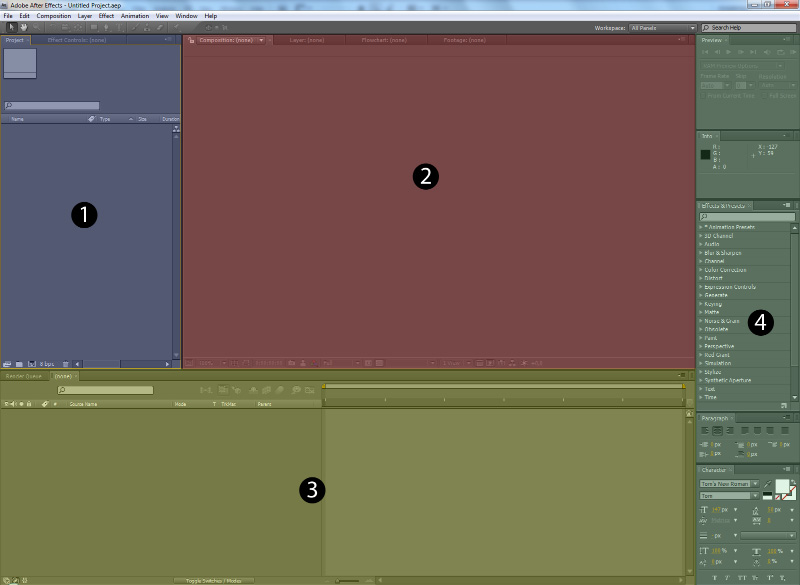
I’ve highlighted as follows:
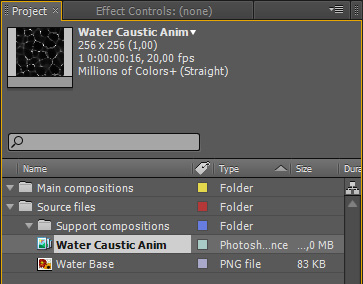
- Project window – you manage your project contents here. After Effects files are “projects” – you should think of them more as a folder containing all “compostions” – think of them as .psd files. (but with an added dimension – time ;)) While you create compositions natively, you have to import any still images, video footage, sounds etc. you want to use into your project – either with file → import, or just drag & drop. What’s great about AFX, is that you can open files from other Adobe software like .PSD or .AI files – they can be treated as a flat, still image, or as a composition – which let’s you access the layers in the file individually etc. It’s a good idea to organize your project files with folders and color coding, since it’s very easy to get them cluttered.
- Effects control is usually tabbed in this window too. This lets you edit all the effects properties of a current layer. More on effects later.
- “View” – it’s a preview window of the currently selected composition or any file in your project (also knows as “footage” – seen in window #1). You can also see raw content of a layer – just double click on anything – if it’s something AFX can open, it will be shown here. You can have a separate composition, layer content, or footage (file) open at the same time – use the tabs to switch between.
- Timeline – meat and potatoes, the core of everything! On the left there are your layers, each one can contain only a single thing – a single video file, image, etc. On the right, is your timeline – here you can adjust when the layer is present in your composition, and place keyframes – places in time, when, for example, you can adjust layer’s transformation values (scale, rotation), opacity, or it’s effects parameters. Parameters between keyframes are automatically blended which results in smooth animation.
- Render queue is tabbed here usually too. This is where you can queue your compositions for rendering and set up parameters for the destination file – extension, video compression, etc.
- Dockable windows – usually, most of them are here – those can contain preview options, text properties, tools & utilities, etc. One of the most important ones, the one I think you should have “on hand” at all times, is the effects window. While it may seem that this probably contains only the counterparts to the Photoshop’s filters, there’s much more to this – this is your main toolbox in AfterEffects. You can find here transformation effects, blurs, fills, texture generators, all color and brightness/contrast adjustments as well as utilities for keying.
In general, this is how the default layout is laid out and it works pretty well (on a single monitor set up of course). If you’re missing something, you can always check out the window menu – you can toggle all the components there and switch between different default workspace layouts (and save your own). The numbered window names are the “main” components, while those without numbers are the extra dockable windows. You can move both the dockable palettes and the core parts, so the layout is pretty customizable.
Let’s start up with our water texture. First, create a new project to make sure you have a fresh start. I recommend you organize it a bit first and then import your files. Since double click opens stuff, press enter to type in a name for a selected item.
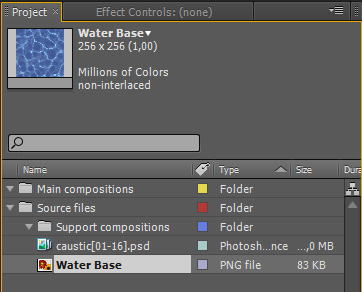
This is how it looks, only files we have is your base texture and the caustic file. Adding a normal image file or a video sequence is easy, however, I’d like to use our caustic animation from the first part – every frame of it as a separate .psd file. How should I approach it? It’s actually easy, go to the import dialog:
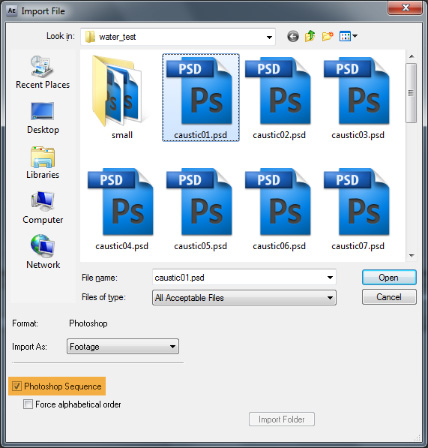
I’ve highlighted the option you need to have checked, it works for all supported image files, not just .psd. This allows you to import single frames into AfterEffects as a single footage files – spares you the horror of placing the frames in order by yourself. ;)
A little by-the-way tip: in case of importing .AI or .PSD files, you will be prompted whether you want to import them as footage or as a composition. Footage treats your file like typical image, while importing as a composition imports the layers from your file individually and creates a new composition which assembles them together. In this case, make sure to order/name your files in the project window. In this case, we need those .PSD files as a footage.
Important thing that’s easy to miss – usually, when importing video files, their frame rate is set up properly automatically. However, single frames don’t contain any information about frame rate, so AFX imports them in it’s default frame rate – 30 FPS. A difference of FPS between the footage and the composition its placed in will cause problems and visual glitches or twitchy movement. Also, 30 FPS will be too fast if you plan working on an animated texture with small amount of frames. In case of game modding, where the animation is controlled by the engine, set up the FPS amount to be able to get a good preview of what you’re doing – not too slow, not too fast. To edit FPS of an already imported file, right click on it and go to interpret footage → main. ( ctrl + alt + g )
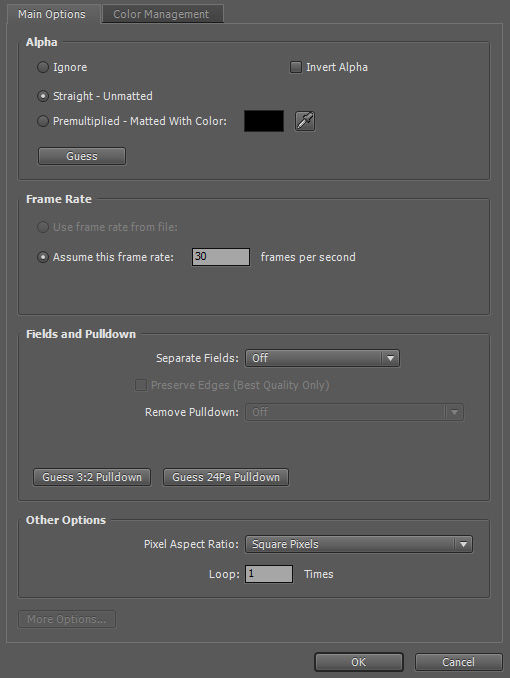
Besides the FPS set up, you can also set up the file to ignore the alpha channel, set up fields when importing interlaced video, set up aspect ratio in case of non-square pixel video, and set up the footage to loop for # times. (very useful).
Since I’ve got a nice set of 16 frames of fluid motion, I’ve decided to use 20 frames per second. Remember this is only for preview purposes if you define your animated texture in the game engine – if you’re doing anything else, this will be the actual FPS count for your result.
With our source files set up properly, we have to set up a new composition. You can either click the create new composition button (The film frame icon, right next to the folder icon in the project window). When creating new composition, you have to type in all the parameters by yourself – XY size, pixel aspect ratio, FPS, duration. However, I’d like to create a composition which would use the exact parameters as the caustic texture – you can do this quickly by pickup up the caustic footage and dragging it into the new composition button. Besides the caustic footage, you can also select the water texture still image – this will create a new composition with desired parameters and already place the caustic animation and the texture inside.
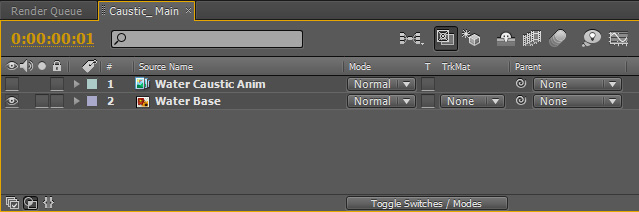
Here’s a peek at the left side of the timeline – the items we dragged into the new comp button are our layers now. The checkboxes on the left: eye and lock work the same like in ‘shop (visibility and toggling non-editable mode), the dot will “solo” the layer and the loudspeaker toggles sound on/off, if your footage file contains it. Next up, you can change colors and names of the layers. Mode list contains the blending modes – those behave exactly as in Photoshop. The TrkMat allows you to use a layer above as a mask for the current layer (Either using alpha channel, or color luminosity), parenting links multiple layers together – child layer will move, scale, rotate etc. relatively to it’s parent. You can either pick the layer from the list, or click the spiral icon and drag to desired layer. Toggle switches/modes button will toggle between other available layer options, but those are a little more advanced and I will not cover them here – the same goes for the button on the top right. The buttons on the lower left toggle what options are visible in the layer field of the timeline window – you can have all the checkboxes at ones, plus in/out points for the layer. Use those options to organize your workspace. Ctrl + click on the timecode to change timecode mode.
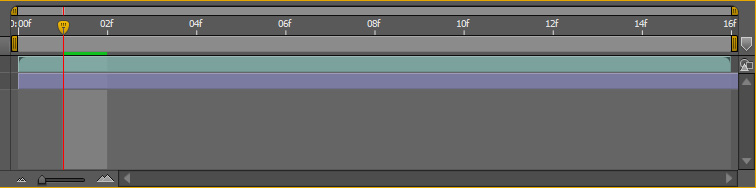
Here’s the timeline. You can adjust the start and end point of each layer, and move any keyframes around. The top bar shows how much of the whole timeline you can see, and the orange pointer is your current position in the timeline. Here’s some useful keystrokes:
- PageUp – one frame backwards
- PageDown – one frame forwards
- Shift + PageUp – 10 frames backwards
- Shift + PageDown – 10 frames forwards
- Home – jumps to the beginning of the composition
- End – jumps to the end of the composition
- [ – shift the current layers starting point to current position in timeline
- ] – shift the current layers ending point to current position in timeline
- alt + [ – trim the layer to start from the current position in timeline
- alt + ] – trim the layer to end in the current position in timeline
- I – jump to layer’s starting point
- O – jump to layer’s ending point
Let’s get to some actual effects ;)
Anytime during working, you can press space or 0 numpad key for a preview – space being the normal play, while 0 being the shortcut to Ram Preview, this prerenderes your animation to ram first, to give you a smooth playback.
Displacement map
We’ll repeat the same we did in Photoshop, except in AfterEffects, to demonstrate how quciker it is. ;) I’ve made the caustic layer invisible, because we don’t need to see it. Select your water texture layer. Open the Effects & Presets palette and pick the Distort → Displacement Map effect.
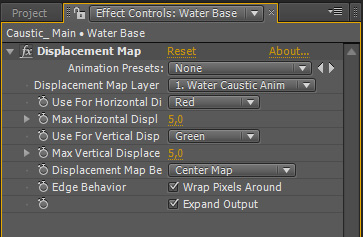
Choose the caustic layer as the “displacement map” layer. Since we use a grayscale image for our displacement, it doesnt matter which color channel we’ll chose. Adjust max horizontal and vertical displacement to suit your taste, and check the Wrap pixels around checkbox, this will make sure the result is tileable.
This method doesn’t require any keyframes to animate, so we could say we’re done here. :) However, in the first part, I’ve mentioned spicing up the our caustic/displacement map. Since the effect uses only raw pixels data, it won’t take any effects applied on the map into account. To get around this, we have to precompose our map. What’s precomposing? Any time while you’re working on your composition, you can pick any layers from it and precompose them – this will move them out of your current composition into a new one. This way, you can have a complex animation you can group into one “block”. The composition made through precompose works just like any other composition – make sure to organise it in your project file. Select the layer and press ctrl + shift + c.
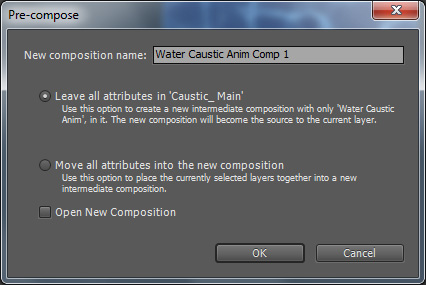
- Leave all attributes – this will only precompose the layer sources. This means that applied effects will stay in the parent composition.
- Move attributes – all effects and properties will be moved into the precompose composition.
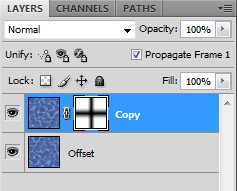
Since this layer has no special properties, this choice makes no difference. Open your new composition. In order to make the displacement more interesting, I’ve decided to duplicate the caustic layer ( ctrl + d ) and apply Blur → Fast Blur ( Bluriness: 12, Repeat Edge Pixels) and Distort → Offset ( 32, 96 ). Afterwards I’ve set up this layer to Screen blending mode. (Keep in mind you do this in the timeline, not with effects.). My displacement map looks now like this:

The added blurry layer will give us some extra soft distortion. Feel free to experiment, you could add another layer with a different amount of blur, use rotation instead of offset, whatever you like. Your main composition will be automatically updated.
In the main comp, for an extra touch, I’ve added a new layer with the plain caustic animation (plain footage, not the precomp), above all other layers – to do this, you can just drag the file from your project window into the comp’s timeline. I’ve set up this layer’s blending mode to screen as well, and this is how I’ve ended up with this:
Let’s try doing something without the caustic map as displacement, AfterEffects only.
Turbulent displace
Create a new composition for this. This time, drag only the base texture into the new composition button. Since you’re loading a static image, you might need to change the actual settings. The last digit of the duration is the amount of frames, set up your FPS depending on how many frames you plan to render out. You can always change those settings later ( right click on the comp in projects, or in the timeline tab → Composition Settings ), but you might have to reposition some keyframes or layers on the timeline if you change duration or FPS.
Once you have your new composition with the plain texture layer, you can apply effects to it. However, I prefer to this on an adjustment layer. Pick Layer → New → Adjustment Layer from the top menu. Those work a bit differently to those in Photoshop – instead of using a new layer for each different adjustment, in AFX, it works as a normal layer, except invisible, and you can apply all kinds of effects, multiple ones. All used effects will be applied to everything visible below.
As you can see, there are some interesting options here. Text is pretty much obvious. Solid is a generic, solid-color filled layer. Those can be used to cut shapes out of them with masks, or as a empty layer to apply effects generating textures, etc. Lights and cameras are a part of AFX’ 3d capability. Null objects are invisible objects that behave like normal layers – those can be used to control other layers or store data – parameters to be used with expressions, keyframes, etc. Shape layers are similar to solids except it has more built-in control over the appearance of both fill and stroke/line (which can be animated).
For the effect, I’ll use turbulent displace (In Distort folder). This is a very distortion effect, works well for a smoky effect, heat distorting view and water as well.
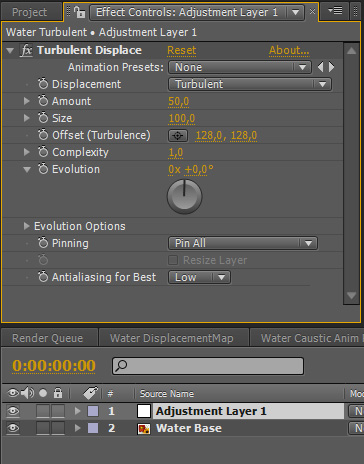
This one is a little more complex:
- Displacement: you have few different options here, all work pretty great. You might want to try out bulge for thicker liquids like sludge, or lava, or limit the displacement to a single x/y axis.
- Amount: this is how much displacement you want.
- Size: the size of the displacement. I’d recommend smaller values for water, since larger ones make it look more smokey.
- Offset: shifts the center point of the displacement.
- Complexity: higher complexity makes the displacement more jagged.
- Evolution: this is the actual control of your displacement’s “progress” – in short, this controls the animation.
- Evolution options: important one! Make sure to check “cycle evolution” to make sure your animation loops seamlessly! You can set up how much cycles it takes before it loops back. In this case, I recommend setting it to 1 or less.
- Pinning: pinning wraps the edge pixels or lock the edges totally. I’ll write more below.
We have a still frame at the moment, so we have to animate the effect controls. Make sure to tick the cycle evolution box, and set up the cycle to 1. Go to the start of the composition (Home), and click the stopwatch to the left of the evolution setting. This turned evolution into “animatable” property. ;) Press U to show keyframes on the current layer. Take note of the rhombus icon to the left of the property:
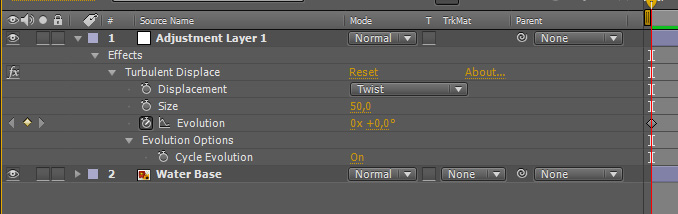
Next, press End to go to the end of the comp and press page down once. You’ll notice that the preview window shows now empty space. This is because we’re outside our comp. Notice the icon shown in the image above is grayed out. Press it – you will create a new keyframe in the current frame. Set the evolution property to 1 (You can either do so in the time line and effect controls). You could also type in the new value without clicking on the icon – the keyframe would be created automatically.
Why did I place the keyframe outside? Because the first frame outside our comp is like our actual first frame – if we place the keyframe in the last frame, we would end up with two identical frames, and so, a stop in the animation which means no fluent movement!
Since now you can now check out the effect in action (space or 0 key), it’s a bit easier to adjust type, size and amount of the displacement.
I’ve used bulge displacement, 100 amount, 15 size, 1 complexity. Here’s the result:
(16 frames)
However there is a little problem… Apply the offset effect and wiggle around the setting, you’ll see…
It doesn’t tile! :P In case of turbulent displace, here’s my way to get around it. First of all, change the pinning options to Pin All Locked. This will make the effect absent on the edges and so, tileable, but that’s not exactly what we want. Afterwards make sure the next effect in the stack is Offset, double the default amount – this will shift the layer by 50% on both axis. Now you need to copy the turbulent displace effect. Select it in the effect stack, duplicate it with ctrl+d, and move it under the Offset. (Drag & drop) You can duplicate the offset too (and move it below) to see if the texture tiles. ;) While theoretically, this intensifies the effect in some areas, it never really bothered me, you can always tweak the settings of the displacement. Here’s the tileable result:
You might also want to know how to use the masking method I’ve mentioned in the previous part.
Masking
I recommend you get your non-tileable result into a new composition. Duplicate you water animation, you can make the top layer invisible for now. Shift the bottom layer with offset by half it’s width. Now, create a new solid ( layer → new → solid ). Move it to the top of the layer stack and then double click on the rectangle tool on the top toolbar, make sure the layer is selected. The shape and pen tools can be used to create new shape layers, or create masks in already existing layer. Double click will automatically create the mask sized to fit the current layer.
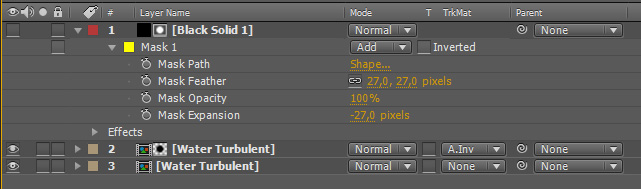
Click the triangle to expand mask options. I’ve turned up mask feather for a soft edge, and turned negative the mask expansion, to move the mask’s edge from the comp’s edge. After that is done, I’ve applied the Offset yet again, to shift the mask to form a cross section in the middle.
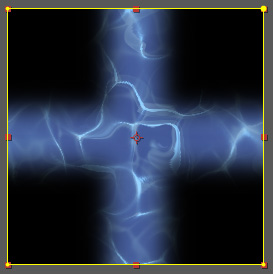
Make sure our water animation duplicate (the non-offset one) is below our mask – select it, and click the second checkbox to use the layer above as a mask. Since the mask is based on transpareny, not lightness, and I want the layer to show through in the cross section, I’ve used Alpha Inverted Matte. This should automatically make the mask invisible, if it’s not, just click on it’s eye icon. I’ve used an adjustment layer with yet another offset to check for tileability.
Still not perfect – middle edges don’t tile. But heck, it’s nothing that another shift+mask trick can’t fix! Unfortunately this method requires to repeat the same steps few times.
So, is this all?
Well, I’m sure that working with layers, effects, blending modes, animating properties and masks are more than enough to keep you going! AfterEffects effect library is pretty big, so that’s a lot to check out and experiment with, just remember about tileability, and the end+1 frame rule for looping. Once you’re happy with your result, go to composition → make movie (ctrl + m). Make sure you’ve set up best quality, full resolution and length of comp time span in render settings and your desired file format in output module – everything with “sequence” in it’s name will render out frames as individual files. Have fun storming the castle! ;)
Leave a Reply